There are different types of yeast you can buy from the grocery store. Generally, yeast requires warmth, sugar and liquid in order to (release carbon dioxide bubbles) rise. Yeast is very sensitive...but most of you probably know that...too much heat and it will die, too cold and the will have "stunted growth."
A few Types of YEAST, and a few things to know:
* Regular Active Dry Yeast: Dehydrated yeast that is generally used in bread recipes
* Quick active Dry Yeast (Rapid Rise Yeast): This yeast allows bread to rise in less time than regular yeast. It can also be used interchangeably with bread machine yeast.
* Bread Machine Yeast: Is a different "strain" of quick active dry yeast. They can generally be used interchangeably (this type just works great in bread machines!). If you are using bread machine yeast or rapid rise yeast, you can use the "One Rise Method." Add all your dry ingredients, including the yeast, then add your wet ingredients.
Tips on using yeast:
- Use it before the expiration date
- 1 Package Yeast = 2 1/4 (some sources say 2 1/2) teaspoons
- Active Dry Yeast can be kept in small packages for up to a year or two
- Putting Yeast in the freezer lengthens its "shelf life"
- You can tell your yeast is "active" when it has been added to the warm water and sugar, and the mixture starts bubbling (for sure after 10 minutes)
- Store yeast in a cool, dark place, and in a sealed container
- If you are using the "One Rise Method" (using rapid rise or bread yeast),
- If you are using regular active dry yeast in your bread machine, you should increase the amount to 1 teaspoon for each 3/4 teaspoon of bread machine yeast.
- To use the traditional Two-Rise Method, add sugar to water before stirring in Yeast
- If you want to freeze your dough, and it rises twice...let it rise once, then freeze your dough. When you are ready to use it, allow it to come to room temperature, shape your dough, and allow it to rise again.
ONE RISE METHOD:
For best results, add undissolved RapidRise or Bread Machine Yeast (you can add 20% less yeast than what you would use for dry active yeast, so use 2 teasoons instead of 2 1/4) to all dry ingredients first. Add warm liquids and fat (butter, shortening). You do not have to rise your dough once before you "shape" your dough. Once your bread is kneaded (or mixed in your machine), and it is soft, it is ready to be shaped.
If your dough needs to be shaped (roll out into rolls, braided to make a braided bread, etc), shape it, place it on the pan, then gently cover and allow to rise. Bake according to the directions.
TIPS TO DECREASE YOUR RISING TIME:
If you want to decrease your rising time using regular dry active yeast, try one of these methods:
- Place your dough in a bowl that is slightly oiled, and cover with plastic wrap. Fill your sink with warm (not boiling, but pretty hot) water, until the water reaches about 3/4 of the way up your bowl. Leave the bowl in the sink of water until the dough doubles in size.
- Turn your oven on as if you were going to preheat it to 350 degrees. Allow it to "preheat" for 10-20 seconds, then turn it off. Place your dough in the slightly warmed oven, proving a nice environment.
- Preheat your oven completely to the lowest setting (most ovens are about 170 degrees). As soon as it reaches that temperature, turn the oven off. Place your dough in the warm oven.
- Put a pan of boiling water on the bottom rack of your oven. Place your dough in a bowl, and put the bowl on the rack above the boiling water.
- Or, use try the One Step Method to eliminate the entire "first rise"
One of my favorite bread recipes comes from one of my favorite Blogs: MADE (see the blog for the full tutorial with pictures). So, here are the directions for this bread using regular yeast, and then using bread machine yeast (using the 1 step method).
BRAIDED BREAD (Taken from Dana-Made-It)
Makes 2 loaves
1/4 cup warm water
2 ½ tsp yeast (or one yeast packet)
1 Tbl sugar
1 cup hot water
1 tsp salt
1/4 cup sugar
2 Tbl butter
2 ½ cups flour
1 egg
1 ¾-2 cups more flour
In a drinking glass or bowl, stir together the warm water, yeast and sugar. Set it aside for about 10 min to rise.In your mixer, combine the hot water, salt, sugar and butter and mix. Once the yeast has risen, add 2 ½ cups flour, 1 egg and the yeast.
Mix all together (using your mixing paddle arm.)Add 1 ¾ cups more flour and mix until a ball forms. If the dough is still too soft, add more flour until the dough feels like squishy play-dough. Take the paddle arm off your mixer and put the hook arm on. Turn mixer on to the number “2” setting (if you have a Kitchen Aid Mixer) and let machine knead the dough for 7 minutes. OR knead the dough by hand for 5-6 minutes on a hard surface.Spray a large clean bowl with cooking spray.
Put the dough in the bowl and cover with a cloth to keep from drying out. Place the bowl in a warm place (like the oven with just the light turned on). A good trick my mom taught me is to turn on your oven for just 10 seconds to let it warm up. Then turn it off and put your dough in there to rise. Don't let the oven heat for too long though, or it will bake your dough (rather than rising it). Just a few seconds is all you need to get it warm in there.Let the dough rise for a couple hours.
Punch the dough down and let it rest for 10 minutes. Spray a cookie sheet with cooking spray.
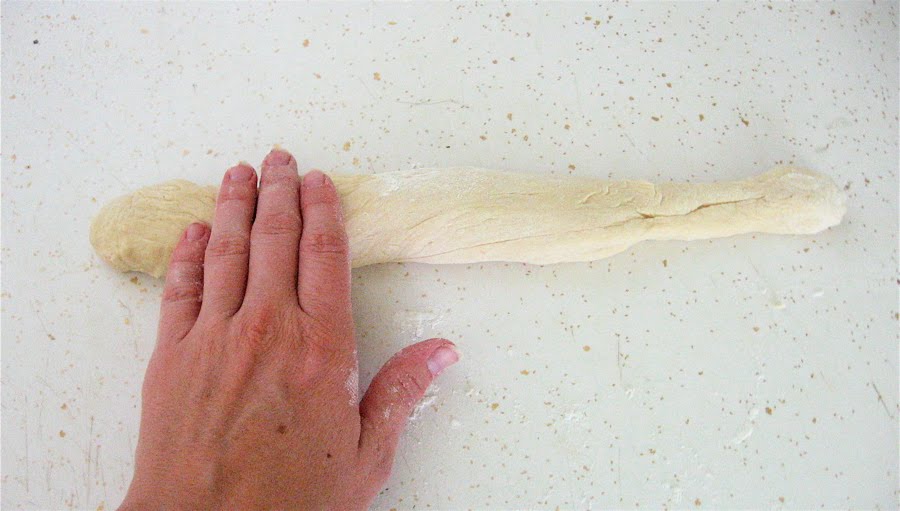
Using a knife, divide the dough in half. Starting with the first ball of dough, divide it into three pieces. Roll each piece into a rope about 14 inches long.Pinch the 3 ropes together at the top, braid the ropes, and pinch the ropes together at the end: Squish the braid together slightly and place the braid onto the prepared cookie sheet, sideways. Repeat with the other ball of dough and place on the same sheet. Cover cookie sheet with a cloth and let rise for about an hour.
Using a fork, whisk together one egg and 1 T. water until well combined (also known as an Egg Wash). Dip a crumpled paper towel into the mixture or use a paint brush and paint the egg wash over the tops and sides of the braids. Be careful as you brush that you don't press too hard or you may deflate the loaves. Heat the oven to 350º (remove the rising braids before heating the oven!).Bake for 14-18 minutes or just till they start turning golden brown. Let the bread sit for 5-10 minutes before cutting. Serve with butter and fresh jam. Enjoy!
Braided Bread: ONE STEP METHOD (This is my version, using the one step method)
BRAIDED BREAD
Makes 2 loaves
2 tsp Instant or Bread Machine yeast
1 1/4 cup hot water
1 tsp salt
1/4 cup sugar
2 Tbl butter
4 1/4 cups flour
1 egg
Add all dry ingredients, including yeast, in your mixing bowl. Add Hot water, butter, and egg.
Mix all together (using your mixing paddle arm.) If the dough is still too soft, add more flour until the dough feels like squishy play-dough. Take the paddle arm off your mixer and put the hook arm on. Turn mixer on to the number “2” setting (if you have a Kitchen Aid Mixer) and let machine knead the dough for 7 minutes. OR knead the dough by hand for 5-6 minutes on a hard surface.Spray a large clean bowl with cooking spray (I just mix everything together, and use my dough hook for the whole thing. Then I knead if necessary).
Spray a cookie sheet with cooking spray. (Or use a SILPAT!)
(The rest of the directions are the same as above) Using a knife, divide the dough in half. Starting with the first ball of dough, divide it into three pieces. Roll each piece into a rope about 14 inches long.Pinch the 3 ropes together at the top, braid the ropes, and pinch the ropes together at the end: Squish the braid together slightly and place the braid onto the prepared cookie sheet, sideways. Repeat with the other ball of dough and place on the same sheet. Cover cookie sheet with a cloth and let rise for about an hour.
Using a fork, whisk together one egg and 1 T. water until well combined (also known as an Egg Wash). Dip a crumpled paper towel into the mixture or use a paint brush and paint the egg wash over the tops and sides of the braids. Be careful as you brush that you don't press too hard or you may deflate the loaves. Heat the oven to 350º (remove the rising braids before heating the oven!).Bake for 14-18 minutes or just till they start turning golden brown. Let the bread sit for 5-10 minutes before cutting. Serve with butter and fresh jam. Enjoy!
Desire for Homemade Bread. Check.
Bread Machine Yeast. Check.
Flour. Check.
Time Saved? Check.
How Easy is That?

No comments:
Post a Comment