Don't you hate when you pull your clothes out of the dryer and they are full of static? Maybe you're tired of buying dryer sheets, because they can be kind of expensive? Well, here's a new trick.
For static:
Take a piece of aluminum foil (yes, the kind you use to cook with), wad it up in a ball, and stick it in the dryer with your load of laundry.
For that Fresh Scent:
When you buy fabric softener at the store, you can put some of it in a spray bottle with some water. Designate a washcloth as your "dryer sheet." Each time you do a load of laundry, spray your washcloth with some of your fabric softener solution and stick it in the dryer with your load. Voila....clean, no static, fresh smelling laundry!
How Easy Is That?
Friday, June 25, 2010
Thursday, May 27, 2010
A tutorial on YEAST
Many people wish they had the patience that it often takes to make homemade bread. "I just have a hard time dedicating my time to letting my bread dough rise twice!" is a common complaint that I have heard. This morning, I made homemade orange rolls for my neighbors (YUM!), and they were so surprised. They thought for sure I had gotten up at 5 am to start on the long, involved process. Thankfully for me, I didn't! I got up at 8, and the rolls were done and ready to be served by 10. So, how do I do it? What's the awesome secret? It is all in the type of YEAST.
There are different types of yeast you can buy from the grocery store. Generally, yeast requires warmth, sugar and liquid in order to (release carbon dioxide bubbles) rise. Yeast is very sensitive...but most of you probably know that...too much heat and it will die, too cold and the will have "stunted growth."
A few Types of YEAST, and a few things to know:
* Regular Active Dry Yeast: Dehydrated yeast that is generally used in bread recipes
* Quick active Dry Yeast (Rapid Rise Yeast): This yeast allows bread to rise in less time than regular yeast. It can also be used interchangeably with bread machine yeast.
* Bread Machine Yeast: Is a different "strain" of quick active dry yeast. They can generally be used interchangeably (this type just works great in bread machines!). If you are using bread machine yeast or rapid rise yeast, you can use the "One Rise Method." Add all your dry ingredients, including the yeast, then add your wet ingredients.
Tips on using yeast:
- Use it before the expiration date
- 1 Package Yeast = 2 1/4 (some sources say 2 1/2) teaspoons
- Active Dry Yeast can be kept in small packages for up to a year or two
- Putting Yeast in the freezer lengthens its "shelf life"
- You can tell your yeast is "active" when it has been added to the warm water and sugar, and the mixture starts bubbling (for sure after 10 minutes)
- Store yeast in a cool, dark place, and in a sealed container
- If you are using the "One Rise Method" (using rapid rise or bread yeast),
- If you are using regular active dry yeast in your bread machine, you should increase the amount to 1 teaspoon for each 3/4 teaspoon of bread machine yeast.
- To use the traditional Two-Rise Method, add sugar to water before stirring in Yeast
- If you want to freeze your dough, and it rises twice...let it rise once, then freeze your dough. When you are ready to use it, allow it to come to room temperature, shape your dough, and allow it to rise again.
ONE RISE METHOD:
For best results, add undissolved RapidRise or Bread Machine Yeast (you can add 20% less yeast than what you would use for dry active yeast, so use 2 teasoons instead of 2 1/4) to all dry ingredients first. Add warm liquids and fat (butter, shortening). You do not have to rise your dough once before you "shape" your dough. Once your bread is kneaded (or mixed in your machine), and it is soft, it is ready to be shaped.
If your dough needs to be shaped (roll out into rolls, braided to make a braided bread, etc), shape it, place it on the pan, then gently cover and allow to rise. Bake according to the directions.
TIPS TO DECREASE YOUR RISING TIME:
If you want to decrease your rising time using regular dry active yeast, try one of these methods:
- Place your dough in a bowl that is slightly oiled, and cover with plastic wrap. Fill your sink with warm (not boiling, but pretty hot) water, until the water reaches about 3/4 of the way up your bowl. Leave the bowl in the sink of water until the dough doubles in size.
- Turn your oven on as if you were going to preheat it to 350 degrees. Allow it to "preheat" for 10-20 seconds, then turn it off. Place your dough in the slightly warmed oven, proving a nice environment.
- Preheat your oven completely to the lowest setting (most ovens are about 170 degrees). As soon as it reaches that temperature, turn the oven off. Place your dough in the warm oven.
- Put a pan of boiling water on the bottom rack of your oven. Place your dough in a bowl, and put the bowl on the rack above the boiling water.
- Or, use try the One Step Method to eliminate the entire "first rise"
One of my favorite bread recipes comes from one of my favorite Blogs: MADE (see the blog for the full tutorial with pictures). So, here are the directions for this bread using regular yeast, and then using bread machine yeast (using the 1 step method).
BRAIDED BREAD (Taken from Dana-Made-It)
Makes 2 loaves
1/4 cup warm water
2 ½ tsp yeast (or one yeast packet)
1 Tbl sugar
1 cup hot water
1 tsp salt
1/4 cup sugar
2 Tbl butter
2 ½ cups flour
1 egg
1 ¾-2 cups more flour
In a drinking glass or bowl, stir together the warm water, yeast and sugar. Set it aside for about 10 min to rise.In your mixer, combine the hot water, salt, sugar and butter and mix. Once the yeast has risen, add 2 ½ cups flour, 1 egg and the yeast.
Mix all together (using your mixing paddle arm.)Add 1 ¾ cups more flour and mix until a ball forms. If the dough is still too soft, add more flour until the dough feels like squishy play-dough. Take the paddle arm off your mixer and put the hook arm on. Turn mixer on to the number “2” setting (if you have a Kitchen Aid Mixer) and let machine knead the dough for 7 minutes. OR knead the dough by hand for 5-6 minutes on a hard surface.Spray a large clean bowl with cooking spray.
Put the dough in the bowl and cover with a cloth to keep from drying out. Place the bowl in a warm place (like the oven with just the light turned on). A good trick my mom taught me is to turn on your oven for just 10 seconds to let it warm up. Then turn it off and put your dough in there to rise. Don't let the oven heat for too long though, or it will bake your dough (rather than rising it). Just a few seconds is all you need to get it warm in there.Let the dough rise for a couple hours.
Punch the dough down and let it rest for 10 minutes. Spray a cookie sheet with cooking spray.
Using a knife, divide the dough in half. Starting with the first ball of dough, divide it into three pieces. Roll each piece into a rope about 14 inches long.Pinch the 3 ropes together at the top, braid the ropes, and pinch the ropes together at the end: Squish the braid together slightly and place the braid onto the prepared cookie sheet, sideways. Repeat with the other ball of dough and place on the same sheet. Cover cookie sheet with a cloth and let rise for about an hour.
Using a fork, whisk together one egg and 1 T. water until well combined (also known as an Egg Wash). Dip a crumpled paper towel into the mixture or use a paint brush and paint the egg wash over the tops and sides of the braids. Be careful as you brush that you don't press too hard or you may deflate the loaves. Heat the oven to 350º (remove the rising braids before heating the oven!).Bake for 14-18 minutes or just till they start turning golden brown. Let the bread sit for 5-10 minutes before cutting. Serve with butter and fresh jam. Enjoy!
Braided Bread: ONE STEP METHOD (This is my version, using the one step method)
BRAIDED BREAD
Makes 2 loaves
2 tsp Instant or Bread Machine yeast
1 1/4 cup hot water
1 tsp salt
1/4 cup sugar
2 Tbl butter
4 1/4 cups flour
1 egg
Add all dry ingredients, including yeast, in your mixing bowl. Add Hot water, butter, and egg.
Mix all together (using your mixing paddle arm.) If the dough is still too soft, add more flour until the dough feels like squishy play-dough. Take the paddle arm off your mixer and put the hook arm on. Turn mixer on to the number “2” setting (if you have a Kitchen Aid Mixer) and let machine knead the dough for 7 minutes. OR knead the dough by hand for 5-6 minutes on a hard surface.Spray a large clean bowl with cooking spray (I just mix everything together, and use my dough hook for the whole thing. Then I knead if necessary).
Spray a cookie sheet with cooking spray. (Or use a SILPAT!)
(The rest of the directions are the same as above) Using a knife, divide the dough in half. Starting with the first ball of dough, divide it into three pieces. Roll each piece into a rope about 14 inches long.Pinch the 3 ropes together at the top, braid the ropes, and pinch the ropes together at the end: Squish the braid together slightly and place the braid onto the prepared cookie sheet, sideways. Repeat with the other ball of dough and place on the same sheet. Cover cookie sheet with a cloth and let rise for about an hour.
Using a fork, whisk together one egg and 1 T. water until well combined (also known as an Egg Wash). Dip a crumpled paper towel into the mixture or use a paint brush and paint the egg wash over the tops and sides of the braids. Be careful as you brush that you don't press too hard or you may deflate the loaves. Heat the oven to 350º (remove the rising braids before heating the oven!).Bake for 14-18 minutes or just till they start turning golden brown. Let the bread sit for 5-10 minutes before cutting. Serve with butter and fresh jam. Enjoy!
Desire for Homemade Bread. Check.
Bread Machine Yeast. Check.
Flour. Check.
Time Saved? Check.
How Easy is That?
Thursday, May 20, 2010
Good Gravy!
Good Gravy! I love gravy...mashed potatoes and gravy, chicken fried steak and gravy, roast beef and gravy, and what would Thanksgiving be without Turkey, mashed potatoes, stuffing...and gravy?...you get the picture. But, who feels guilty about putting gravy on things because it has all that FAT? Ok, well sometimes I don't care that much, but sometimes I do. What if there was a way to decrease the fat content of your homemade gravy? I didn't say make it "perfect" or "healthy" necessarily, just better. Of course, I wouldn't be posting this if there wasn't a solution. So, here it is:

A Gravy Separator
A gravy separator is designed to separate the fat from pan drippings (or juices left in your crockpot, if you cook in there like I do), leaving the "flavorful juices" behind.
There are a TON of different styles of gravy separators. The simplest and, according to WiseGeek.com, the most efficient is a "specially designed pitcher with a spout which connects the bottom half of the pitcher. To use the gravy separator, cooks pour pan juices and drippings in and allow them to sit until the fat rises to the top."


To do this faster, and/or a little more efficiently, you can fill the gravy separator half-full with ice cubes. The fat will congield to the ice cubs, which will make the process quicker and easier. Pour your juices into the separator, and wait for the fat to rise. Then just tip the gravy separator to pour out the juices, while will emerge first since the spout is on the bottom of the tool. Some brands of separators include a filter in the spout to catch large chunks in the drippings. (If I cook a roast, I always cook it with a packet of Onion Soup Mix. If you don't like the onion parts, a filter is useful. However, you can also pour the juices through a small kitchen strainer, which works just as well.) I usually pour the liquid from my separator directly into a sauce-pan so that I can thicken it on the stove (with a 1-2 tablespoons cornstarch softened in water).
This type of gravy separator can be very large, which can hold a lot of drippings. They usually contain volume measurements, so you know how much liquid you have to deal with.
*Hint: when you buy a "fat separator," try to find one that is heat-resistent and dishwasher safe. You will likely be pouring hot juices into it, and then you will want to run it through the dishwasher to remove the grease that would otherwise build up.
*Another Hint: If you need to separate fat from a pan of drippings in a hurry and you don't have a gravy separator, stick it in the freezer for a few minutes, just until the fat floats to the top and congeals. Then, you can gently peel it off and discard it, leaving the usable drippings behind.
How Easy Is That?!?
Tuesday, May 11, 2010
Drop a note to a friend or family member
Nothing makes someones day more than a heartfelt, sincere, note. Some of my most treasured possessions are notes and cards I have received from family and friends expressing a kind sentiment or expressing their love for me. I appreciate these so much and I look forward to birthdays and holidays when I know I might be receiving one. My husband, like many men, has a hard expressing emotion verbally, but expresses it to me in writing. I have kept all of the cards he has written to me over the 29 years we have been married. They mean so much to me and are among my most prized possessions. I like to re-read them and they make me smile every time I do. Likewise I have cards, notes, and letters written to me by my children that I also consider priceless. How often in life do we fail to tell those we love the very most how much they mean to us? We get busy with the menial daily activities and opportunites in which we should be telling those we love how special they are to us drift quietly by. We also seem to forgo telling others we admire them or tell them we notice thier talents or compliment them when we have a kind thought on thier behalf.
I received a wonderful email from a very dear friend a few days ago. It was an email written by someone else expressing how she felt about her mother. My friend forwarded the email to me and said she was sure my children felt the same way about me this young woman felt about her own mother. It made me cry. I have known this dear friend all of my life but we don't see or correspond very often, making this email even more meaningful to me. It only took her a minute or two to forward this email but it made my day, month and even my year to have her share this with me. I will remember how she made me feel for a long time to come, maybe forever. I heard something one time about how someone would never forget how you made them feel. Do we uplift and compliment those around us or do we drag down and depress those who are around us? Do we look for the positive or concentrate on the negative? Do we think about ourselves focusing on selfishness or do we forget ourselves and focus on selfishness?
Drop someone you know a note today. Make someone feel good about themselves and tell them how much they mean to you. You will never know how you might touch someone else for a lifetime. How easy is that?
Monday, April 19, 2010
Labeler
Hi,
I know, I know, I am a slacker. Sorry it has been a while since I gave a good hint. Life sort of crept in and took over, but now I am recommitting to get back to passing along easy ideas.
Today I wanted to talk about my labeler. I used to think that a labeler took too much time to use to label everything, but boy was I wrong. I first saw the idea of using a labeler from Martha Stewart. Who would have thought? But as I have worked on getting organized over the years, many of the professional organizers recommended using them. I use my labeler alot and use it to label things I never would have imagined it would help me with. I use a P-touch labeler and they are available at many places. I got my at Costco and I bouguth my daughter-in-law one for her birthday from there as well. They are also avaiable at Walmart or any other vairety store. They cost about $20 or $25 and are well worth the investment. They are very easy to use and there are unlimited uses for them. I have used it to label my CD boxes, kitchen containers, drawers I wanted to organize, boxes with pictures in them, containers with decorations in them, tabs on notebooks, my various cords, (see post on organizing cords), the pockets of my shoe organizer where I keep my spice packets etc. (see post on shoe organizers), sewing notions, and about a million other things. It is really worth the investment and the time and effort to label things. Once something is labeled, everyone in the house knows where to find it and more importantly, where to put it back. It also saves a lot of time when you don't have to tear things apart looking for something because you have labeled where it is which makes it so fast and easy to find. I was really skeptical about how much this would really help me, but once I decided to try it, I really can't believe I didn't do this before. How easy is that?
Friday, April 16, 2010
A Problem...and A Solution
Sorry for the update Drought! My mom came to visit for a week, and then I had to finish with school! I now officially have my Bachelor's Degree in Nursing (Hooray!)....and more time to blog! Yippee!!
I had a problem. Well, it was actually two problems. But these were two big problems that had been causing me much grief. I was embarrassed when people came to my house.
Problem 1:
This is what my "nook" looked like. A mess, right? Like anybody could even find anything in this mess! Problem 2:
My spice Cabinet was a mess. It actually looked worse than this. We took this picture after we had already stuck one turntable in the cabinet. Let's face it. It took me longer to find the spices I needed when cooking dinner, than it did to actually measure them and add them to a recipe. Sad...but true.
This is what my "nook" looked like. A mess, right? Like anybody could even find anything in this mess!
Problem 2:My spice Cabinet was a mess. It actually looked worse than this. We took this picture after we had already stuck one turntable in the cabinet. Let's face it. It took me longer to find the spices I needed when cooking dinner, than it did to actually measure them and add them to a recipe. Sad...but true.


And this:


And yes, it still looks like that (my nook is a little messier, due to some current projects), but it has been clean for over a month now! Hooray! My mom is seriously the BEST!
And what I learned from this project?
1: Circles are BAD for organizing (except for a turntable for the spice cupboard). Squares or rectangles are MUCH better. I had a lot of round baskets and stuff...it just doesn't fit well, trust me. There is a lot of wasted space with circles.
2. When you find something you want to organize, measure everything BEFORE You go to the store. This helps make sure that whatever you buy is going to fit properly.
3. Square/Rectangle baskets are awesome. It is SO much easier to get things out and put them back (such as if you have to put a row of things, like my spices. I can pull out the basket, and still reach the spice that is in the back). And use baskets inside your totes!
Inside the drawers, I have long skinny baskets that hold things too. Remember the rule...you should be able to put it away in ONE step (you shouldn't have to move anything). If you want it bad enough, you will spend a few seconds to get it out, but if it's not easy to put away....things will become a mess.
4. Label. Everything.
5. Buy clear totes when you are buying them. You can see what is in the tote that way.
6. The Dollar Store is a GREAT place to buy organizing supplies. We bought tons of stuff at the dollar store. The rest, we found on clearance at Target.
Saturday, March 6, 2010
Another organizing tip--Shoe Organizers


I want to introduce you to one of my favorite things:
A SHOE ORGANIZER
Shoe organizers, the kind that have pockets and hang from your closet door, are fantastic! They can certainly be used for pairs of shoes...but around our house, they are used for so much more!
I should almost be a little embarrased to admit how many of these I have in my house, but I have one in every single closet in my house (except one)! Let me tell you the uses I have put these amazing shoe organizers to. Granted, as my life has changed, I have done re-organizing and changing here and there, but I'll give you a few ideas. *Note: there are different sizes you can find, so some have more pockets than others! The above pictures are some pictures of how my mom uses hers. She labels all of her pockets so you can see where to put things. Hers includes seasoning packets, jello, soup mixes, drink mixes, dip mixes, and any other types of things that don't have a home.
1. My Boys Room: I have stored things (depending on my needs at the time) such as socks, shoes, slippers, swimsuits, lotions/creams, pacifiers, nail clippers, brushes, combs, blankets, crib sheets (I roll them up and stick one or two sheets in a pocket), disposable diaper bags, burp rags, hats, bibs, gloves, extra bottles, toys, onsies, medicines (my older son can climb onto the bathroom counter, and can open the medicine cabinet. He cannot get to the top pockets of the organizer, also if I don't want him to know that the medicines are in there, I line the pocket with a paper or cloth so that he cannot tell what is in the pocket), play dough, etc.
2. My bedroom/Bathroom: burp rags (I like to have some in my room too, since my baby is still pretty small), shoes, t-shirts, socks, underwear, etc. If it is in my bathroom: make-up, hair-spray, gel, any other hair products, brushes, combs, my flat-iron, blow dryer, lotions, face-wash, moisturizer, curling irons, hair ties, headbands, washcloths, hand towels.
3. My Living Room: Shoes, socks, gloves, hats, bubbles, umbrellas, sidewalk chalk, slippers, toys, bike air-pump, hats, my work-badge and stethoscope and scissors (I'm a nurse), blow-up pool items (floaties, balls, etc), small blankets to toss over my baby's car seat.
4. My kitchen. I have multiple ones in my kitchen, so I will give you a few ideas.
a. Baby bottles, bottle liners (if you use those type of bottles), bottle brush, baby food, bibs, pacifiers, baby spoons, sippy cups, baby treats (like the puffs, individual baggies of cheerios, biter buscuits, etc), individual little bottles of juice and/or water.
b. SNACKS. I have one entire organizer designated for snack items. I rotate things through, I just can't stand having all the little individual bags of stuff, or granola bars always laying around. But in the box, they take up so much room in the cupboards. So, I keep things like: granola bars, raisins, 100-calorie pack snacks (or make your own individual baggies of cookies or crackers...saves money!!), anything that comes individually packaged (personal bags of chips, goldfish crackers, marshmallows, granola bites, etc), trail mix, nuts, dried fruit, etc. I generally don't fill quite the entire thing with snacks, so I might also add other things. For example, right now I also have baby food in some pockets, and playdough in some pockets.
*If you don't want to buy individually packaged snacks, do it yourself! My two favorite things to use are baggies....and baby-food containers. I save and wash all the little plastic baby food containers I get. They are the PERFECT size for some nuts or trail mix, and are great to pack in your loved one's lunch!!

 c. Other: (this is the one where I need my mom to upload her picture....her's looks much better than mine!) boxes of jello, boxes/packages of rice or noodles (like rice-a-roni or whatever), seasoning packets (taco seasoning, gravy mix, anything that comes in a little pouch/packet), nuts, coconut, empty baby-food containers, spices or seasonings, small bottles (liquid smoke, cooking spray, molasses, tobasco sauce, if you buy shortening in the cubes like butter).
A SHOE ORGANIZER
Shoe organizers, the kind that have pockets and hang from your closet door, are fantastic! They can certainly be used for pairs of shoes...but around our house, they are used for so much more!
I should almost be a little embarrased to admit how many of these I have in my house, but I have one in every single closet in my house (except one)! Let me tell you the uses I have put these amazing shoe organizers to. Granted, as my life has changed, I have done re-organizing and changing here and there, but I'll give you a few ideas. *Note: there are different sizes you can find, so some have more pockets than others! The above pictures are some pictures of how my mom uses hers. She labels all of her pockets so you can see where to put things. Hers includes seasoning packets, jello, soup mixes, drink mixes, dip mixes, and any other types of things that don't have a home.
1. My Boys Room: I have stored things (depending on my needs at the time) such as socks, shoes, slippers, swimsuits, lotions/creams, pacifiers, nail clippers, brushes, combs, blankets, crib sheets (I roll them up and stick one or two sheets in a pocket), disposable diaper bags, burp rags, hats, bibs, gloves, extra bottles, toys, onsies, medicines (my older son can climb onto the bathroom counter, and can open the medicine cabinet. He cannot get to the top pockets of the organizer, also if I don't want him to know that the medicines are in there, I line the pocket with a paper or cloth so that he cannot tell what is in the pocket), play dough, etc.
2. My bedroom/Bathroom: burp rags (I like to have some in my room too, since my baby is still pretty small), shoes, t-shirts, socks, underwear, etc. If it is in my bathroom: make-up, hair-spray, gel, any other hair products, brushes, combs, my flat-iron, blow dryer, lotions, face-wash, moisturizer, curling irons, hair ties, headbands, washcloths, hand towels.
3. My Living Room: Shoes, socks, gloves, hats, bubbles, umbrellas, sidewalk chalk, slippers, toys, bike air-pump, hats, my work-badge and stethoscope and scissors (I'm a nurse), blow-up pool items (floaties, balls, etc), small blankets to toss over my baby's car seat.
4. My kitchen. I have multiple ones in my kitchen, so I will give you a few ideas.
a. Baby bottles, bottle liners (if you use those type of bottles), bottle brush, baby food, bibs, pacifiers, baby spoons, sippy cups, baby treats (like the puffs, individual baggies of cheerios, biter buscuits, etc), individual little bottles of juice and/or water.
b. SNACKS. I have one entire organizer designated for snack items. I rotate things through, I just can't stand having all the little individual bags of stuff, or granola bars always laying around. But in the box, they take up so much room in the cupboards. So, I keep things like: granola bars, raisins, 100-calorie pack snacks (or make your own individual baggies of cookies or crackers...saves money!!), anything that comes individually packaged (personal bags of chips, goldfish crackers, marshmallows, granola bites, etc), trail mix, nuts, dried fruit, etc. I generally don't fill quite the entire thing with snacks, so I might also add other things. For example, right now I also have baby food in some pockets, and playdough in some pockets.
*If you don't want to buy individually packaged snacks, do it yourself! My two favorite things to use are baggies....and baby-food containers. I save and wash all the little plastic baby food containers I get. They are the PERFECT size for some nuts or trail mix, and are great to pack in your loved one's lunch!!
 c. Other: (this is the one where I need my mom to upload her picture....her's looks much better than mine!) boxes of jello, boxes/packages of rice or noodles (like rice-a-roni or whatever), seasoning packets (taco seasoning, gravy mix, anything that comes in a little pouch/packet), nuts, coconut, empty baby-food containers, spices or seasonings, small bottles (liquid smoke, cooking spray, molasses, tobasco sauce, if you buy shortening in the cubes like butter).
Now, you have to make sure that you get the clear plastic ones, so you can see what is in each pocket. My favorite place in the past has been to buy them at Rite-Aid. You can also find them at Walmart, Target, or anywhere like that. The last time I bought one at Target and Walmart it seems like they were about $7 or $8. If you are looking for a smaller one, for a narrow closet or for only a few things (the one in my bedroom that has only burp rags, and a few small things), you can find them at the dollar store! Just decide what you want to put in them, how many you need, and start organizing!! How easy is that?
Tuesday, February 16, 2010
Organizing Cords


Remember how we talked about figuring out solutions to our own organizational problems? Well I thought I would share one of my problems and how I figured out how to solve the problem. I had a whole bunch of different kinds of cords that are out of control so I thought maybe I could figure out how to get them under control. At the local hardware store (Lowe's in this case) I found these rolls of Velcro strips (quick tie type things) that stick together to form a loop. You can loosen them or tighten them to be as big are as small as you need them to be. I use them for all sorts of things, but for today's hint I am using them to hold together all of my camera cords, Ipod and Zune cords and various types of computer cords. We store all of these cords near our computer because that is where we use them. I found a wire basket that I just throw my cords into after they are labeled and wound up withe the Velcro ties. I use a Brother P-Touch labeler, which I LOVE, and I print out a label for each cord. Each one of our family members have different cameras and different MP3 devices so our cords are always getting confused with someone else's. This has been a wonderful solution for me and the rolls of Velcro ties are only a couple of dollars so it is also a very cost effective solution. I also use these ties to roll and bind the many cords under the computer desk such as the printer cord, the phone cord, the speaker cords etc. to keep them under control. It has been a great solution for one of my organizational problems. How easy is that?
Best Kept Secret
Ok, so this really isn't a secret...but it is something that I don't think people take enough advantage of. THE LIBRARY!
Did you know that you can check movies out from your local library....for Free? They even get new releases!
Did you know that you can keep books for a month at a time?
Did you know that many libraries offer story times and activities for your kids?
Did you know that you can access your library's catalog online? That way you can see if the book you want is available or if it is checked out. Many libraries even let you reserve your books/movies online.
Did you know that you can use the internet at the library for free? Don't you hate it when your computer or internet is having problems...and you are waiting for an important e-mail?
Did you know that you can check out audiobooks online? You can even download them to your computer. Our local libraries allow us to download the books and the file is left on our computer for 1 week. If you cannot listen to your audiobook in 1 week...don't worry! You can burn the book to disks, or download it to your IPOD...where it stays until you delete it! I have a hard time justifying sitting down to read a book, but I LOVE to listen to audiobooks while I clean the kitchen or fold my laundry!
It is free to get a library card...and very easy! If you don't have a library card...make it a point to go get one! How easy is that?
Monday, February 8, 2010
Organizing-- You are Smarter than you think--Figuring Out Your Own Problems
What is your problem? I mean, what is your organizing problem? I have been on a quest for most of my married life (almost 29 years) to be totally organized. Now I have to confess that I have not yet achieved this goal, but I am still working towards it. Something that I finally concluded after many years is that I needed to figure out what MY organizing problems were and what my organizing solution style is. For example, I have tried many filing systems over the years that have been recommended by friends or other professional organizers. I found out that what other people recommend was not always successful for me. After trying several of them and being unsuccessful, I combined some of the the ideas into a system that works for me.
It is kind of interesting to me that it took me so long to figure this out. I had an ah ha moment one day. It finally dawned on me that I could figure out what works best for ME. My lifestyle and habits are not the same as anyone else. I figured I was a pretty smart person and could find solutions to my organizational problems. I still read organizational books and articles and surf the web looking for ideas, but I realized my problems are my problems and I needed to find out what worked for me and my family.
You can do it too. I will give you some of my ideas in upcoming posts and you can use them as they are or use them to spark an idea of your own. What works for me will not always work for you, but you might get some good ideas you could implement into your own organizing style.
How easy is that?
Sunday, February 7, 2010
Diaper Cream
My two sons have inherited terrible skin, which brings about many unfortunate bouts of ezcema....and AWFUL diaper rashes. My older son has (and continues to have) very frequent diaper rashes, but unfortunately, we have tried about every cream out there and they all give him Yeast Infections. Ugh! Diaper rashes are awful, but add horrible bleeding "satellite pimples," and every diaper change turns into a screaming, crying, fighting mess.
Each time we finally got rid of a yeast infection, a new one would creep up. We would try various diaper rash creams, and he will end up with yet another yeast infection. The poor kid's bum could have been used for a textbook picture on terrible diaper rash/yeast infections!
We were feeling quite frustrated, and presented our concerns to our doctor. In order to treat the poor bleeding pimples, our family doctor recommended that we quit using diaper cream until the sores were gone...he also recommened that we try using Neosporin + Pain Relief instead.
I LOVE this stuff! It not only helps with the sores, but it hels with the diaper rash....and the pain. Neosporin with pain relief also includes a topical pain-reliever. It works quickly and very well. You can find the neosporin with pain relief in both a cream and an ointment form. Many stores also carry "off-brand" versions, which contain the same ingredients and work just as well. We haven't used diaper rash cream in over a year now, and have not had a single yeast infection! Hooray for that! If you're struggling with diaper rashes with your kids, give Neosporin + Pain Relief a try! How easy is that?

Thursday, February 4, 2010
Rosemary Skewered Chicken (or beef) with Orange Glaze
Thank you Chef Curtis Stone (Take home chef, ya know, the cute British guy? He also does recipes for The Biggest Loser). I found this recipe online for the chicken, and thought it sounded easy and yummy. I decided to use stew beef instead of chicken (because that is what I had that was not frozen). I cannot believe how big of a hit it was at my house!! Kellen and Rykker had seconds, and Kellen couldn't stop telling me how delicious he thought it was! So, I thought I'd better share it with you!!
Rosemary Skewered Chicken (or beef) with Orange Glaze
Ingredients
Juice of 3 oranges (you can also use orange juice from concentrate)
1 Tbsp. Dijon mustard
1 Tbsp. honey
2 garlic cloves, finely chopped
1 Tbsp. finely chopped peeled fresh ginger (or 1/4 -1/2 tsp dried, ground ginger)
4 boneless skinless chicken breasts, cut into 1 inch cubes
6 large sprigs of rosemary about 10 to 12 inches long, with half the leaves removed
Instructions
1. Preheat a grill or grill pan on medium high heat.
2. Place the orange juice into a small saucepan and cook over medium heat until the orange juice has the consistency of a very thin syrup. Add the Dijon, honey, garlic, and ginger and continue cooking over medium heat for 2 to 3 minutes. Remove from heat to allow flavors to meld and reserve.
3. Evenly divide the cubed chicken among the rosemary sprigs and skewer the chicken onto the exposed part of the rosemary sprigs. (Beef is a little harder to skew, so I stuck a real wooden skewer through it first to make a hole. Then I threaded the beef onto the rosemary sprig. This recipe wouldn't be the same if you just cooked the meat on a regular skewer rather than the rosemary).
4. Lightly brush the grill with oil and grill chicken for 1 to 2 minutes on each side or until the internal temperature of the chicken reaches 165 degrees F on an instant read thermometer.
5. Remove skewers from the grill to a serving plate, drizzle with the orange sauce and serve immediately.
I served it with Rice Pilaf...and Kellen was wishing I had doubled the sauce, since he likes to put the sauce on his rice! Hope you enjoy!
Wednesday, February 3, 2010
No extenstions, substitutions, or refunds...
Have you ever been cooking, and you are missing 1 or maybe 2 ingredients? Ugh! I hate when that happens. You are making a recipe that calls for buttermilk, but you don't have any! What do you do? Do you drop everything, pack your kids into the car, and run to the grocery store for 1 ingredient? Do you call EVERY NEIGHBOR in your neighborhood or complex to see if they have some?
Well, there are better ideas! There are many ideas of substitutions available. Many substituions are available on the internet, or in magazines or cookbooks. Here are a few ideas:
1 medium clove of garlic = 1 1/2 tsp chopped, 1 tsp minced , or 1/2 to 1 tsp bottled minced, or 1/8-1/4 tsp of garlic powder.
1 cup buttermilk = 1 Tbs lemon juice or vinegar plus enough milk to make 1 cup (let stand for 5 minutes before using); also use 1 cup plain yogurt
1 cup corn syrup = 1 cup granulated sugar plus 1/4 cup water
1/2 cup chopped onion = 2 tbs minced dried onion or 1/2 tsp onion powder
1 cup dairy sour cream = 1 cup plain yogurt (this is often a healthier choice, especially if you use lowfat yogurt)
1 cup red wine = 1 cup beef brother or chicken both (for savory recipes), 1 cup cranberry of cherry juice (for sweet recipes like desserts)
1 cup white wine = 1 cup chicken broth or 1 cup apple or white grape juice
1 package active dry yeast = 2 1/4 tsp active dry yeast
1 tbs Fresh herbs = 1/2 to 1 tsp dried herb, crushed, or 1/2 tsp groupnd herb
Why go to the store if you can use things you have at home? How easy is that?
Apricot Chicken
I thought you might like an easy dinner recipe for tonight!! Spray your crockpot with cooking spray. Place 1 bottle Russian Salad dressing, 1 package dry Lipton onion soup mix, and one bottle of apricot jam in the crockpot and stir together. Place about 6 boneless skinless chicken breasts in the sauce and cook for about 4 hours on high or 6 hours on low, depending on your time and your crockpot. Serve over rice. This is one of my husband's favorite dinners. I love it because it is so easy. ANYONE can make this dish!! How easy is that?
Monday, February 1, 2010
Coffee Filters

I already listed in a previous post about how I love using coffee filters for cleaning windows/mirrors. I received a forward e-mail this morning regarding other uses for coffee filters, and thought maybe you might find them useful:
Better than paper towels and a lot less expensive...COFFEE FILTERS
Coffee filters .... Who knew! And you can buy 1,000 at the Dollar Tree for almost nothing even the large ones.
1. Cover bowls or dishes when cooking in the microwave. Coffee filters make excellent covers.
2. Clean windows, mirrors, and chrome... Coffee filters are lint-free so they'll leave windows sparkling.
3. Protect China by separating your good dishes with a coffee filter between each dish.
4. Filter broken cork from wine.. If you break the cork when opening a wine bottle, filter the wine through a coffee filter.
5. Protect a cast-iron skillet. Place a coffee filter in the skillet to absorb moisture and prevent rust.
6. Apply shoe polish. Ball up a lint-free coffee filter.
7. Recycle frying oil. After frying, strain oil through a sieve lined with a coffee filter.
8. Weigh chopped foods. Place chopped ingredients in a coffee filter on a kitchen scale.
9. Hold tacos. Coffee filters make convenient wrappers for messy foods.
10. Stop the soil from leaking out of a plant pot. Line a plant pot with a coffee filter to prevent the soil from going through the drainage holes.
11.. Prevent a Popsicle from dripping. Poke one or two holes as needed in a coffee filter.
12. Do you think we used expensive strips to wax eyebrows? Use strips of coffee filters.
13. Put a few in a plate and put your fried bacon, French fries, chicken fingers, etc on them. It soaks out all the grease.
14. Keep in the bathroom. They make great "razor nick fixers."
15. As a sewing backing. Use a filter as an easy-to-tear backing for embroidering or appliqueing soft fabrics.
16. Put baking soda into a coffee filter and insert into shoes or a closet to absorb or prevent odors.
17. Use them to strain soup stock and to tie fresh herbs in to put in soups and stews.
18. Use a coffee filter to prevent spilling when you add fluids to your car.
19. Use them as a spoon rest while cooking and clean up small counter spills.
20. Can use to hold dry ingredients when baking or when cutting a piece of fruit or veggies.. Saves on having extra bowls to wash.
21. Use them to wrap Christmas ornaments for storage.
22. Use them to remove fingernail polish when out of cotton balls. 23. Use them to sprout seeds.. Simply dampen the coffee filter, place seeds inside, fold it and place it into a plastic baggie until they sprout.
24. Use coffee filters as blotting paper for pressed flowers. Place the flowers between two coffee filters and put the coffee filters in phone book.
25. Use as a disposable "snack bowl" for popcorn, chips, etc.
OH, YEAH, THEY ARE GREAT TO USE IN YOUR COFFEE MAKERS :)
Second step to menu planning
Now that you have successfully made your menu list, it is time to tackle making a menu. I have several suggestions. The first one is to download an empty calendar for the month and fill in the calendar with things off of your list you would like to make. You can also use many of the online menu planners that can help with managing your menu and your grocery list. You can plan your menu from things you already have in your freezer or pantry or plan your menu and make a grocery list of the things you need to purchase for the things on your monthly menu. Another suggestion is to plan a six week or eight week menu plan and rotate it. Start with week one and go through week eight and then start over with week one again. This seems to be successful because most people eat a lot of the same things over and over again anyway. You can also make just a weekly menu. Make sure you add in the times you are planning to eat out for a special occasion or date night and also add items you would like to try. After trying something new, if it is successful, add it to your permanent menu list or discard it as tried, but not successful.
When I plan my menu I try to use variety. As you have seen from our menu list, we eat a lot of chicken. It might look deceiving like we don't have a lot of variety because we eat mostly chicken, but we really do eat quite a range of food. I like to do maybe a comfort food dish one night, a Mexican dish one night, an Italian dish one night and maybe a beef dish one night. I try not to do the same type of food two nights in a row so we do have a greater variety. You can get creative on how you plan your menu, but if you know what you are having for dinner before you go out the door for the day, your day will run much smoother. How easy is that?
When I plan my menu I try to use variety. As you have seen from our menu list, we eat a lot of chicken. It might look deceiving like we don't have a lot of variety because we eat mostly chicken, but we really do eat quite a range of food. I like to do maybe a comfort food dish one night, a Mexican dish one night, an Italian dish one night and maybe a beef dish one night. I try not to do the same type of food two nights in a row so we do have a greater variety. You can get creative on how you plan your menu, but if you know what you are having for dinner before you go out the door for the day, your day will run much smoother. How easy is that?
Friday, January 29, 2010
Menu Planning--Making a menu list
January--the start of the new year. How are your New Year's resolutions coming? Is menu planning one of your goals? If not, maybe you should add it. I heard a good piece of advice one time. It went something like this "never leave your house in the morning without putting in a load of laundry, picking up the house, or knowing what you are having for dinner." We are going to focus on knowing what you are having for dinner.
Do you have a menu plan? If not you can make one really easy. The first thing you need to do to start a menu plan is to write down a list of things your family likes to have for dinner (or any other meal, we are focusing on dinner). It only takes a few minutes because if you are like most families you have your favorites. You know, the things you cook all the time. This might include pizza or tacos or spaghetti. Get your family involved and ask for what they would like to add to the list. I think it will surprise you at how many things you can come up with. I sat down for a minute and listed our family favorites and came up with 65 things and I keep thinking of others that I can add. My husband has celiac disease which means he cannot eat things that contain gluten (wheat, barley, rye). It is somewhat challenging to cook for him but all of my menu items can be adapted to gluten free cooking. I will add a link to my menu list so you can get the idea. This is the first step in menu planning. As a first step in menu planning, make your list and then we can add ideas on how to actually adapt your list to an actual menu plan in upcoming posts!! How easy is that?
DINNER IDEAS
CHICKEN
Grilled Chicken Caesar Salad
Ranch Chicken
Sweet and Sour Chicken
Apricot Chicken
Red Flame Chicken
Spicy Chicken Alfredo
Fiesta Lime Chicken
Chicken Salsa Wraps
Sweet Mexican Chicken
Chinese Chicken Salad
Stir Fry
Chicken Noodle Soup
Chicken Stroganoff
Chicken Cordon Bleu
Chicken Pot Pie
Swiss Chicken
Lon’s Chicken
Chicken Enchiladas
White Chicken Chili
Chicken Rice Bowls
Whole Chicken
Honey Sesame Chicken
Chicken and Broccoli
BEEF
Spaghetti
Spareribs
Tacos
Lasagne
Stroganoff
Beef Roast
Pot Roast
Hungarian Beef
Saucepot Meatballs
Nadine’s Meatballs
Hamburgers
Red Swiss Steak
Mushroom Swiss Steak
London Broil
Steak
Tostadas
Beef Enchiladas
Nacho’s Grande
French Dip
Chili
PORK
Spareribs
Cranberry Pork Roast
Café Rio Pork
Chicken Licken Pork Chop
Red Pork Chops
Pork chops and Potatoes
Pork Roast
Sweet and Sour Pork
OTHER
BBQ Turkey
Pizza
Breakfast for dinner
Creamy Potato Soup
Cheese Soup
Broccoli Cheese Soup
Salmon
Talapia
A Place for everything and eveything in its place
Hello All!!
Today I wanted to introduce another concept in organizing. Have you ever heard the phrase "a place for everything and everything in its place"? Easier said than done, right? Well it may be true but if this one concept is put into place, it can make a HUGE difference in the way your home is organized.
Do you have a "home" for things in your home? If you asked someone to go get the tape, could they walk right to where it is located and retieve it in one or two motions, or would it be a frantic time of tearing every drawer apart trying to find it? If you can't find the tape, (or anything else) this concept might be one for you to work on. If you can teach yourself and your family that there is one place that an item is kept, it will be much easier to keep those things organized and in place. There are many things in our homes that we already do this with like dishes or silverware in the kitchen. At our home the plates go in the cupboard and are stacked in an orderly manner and the silverware goes in the drawer in seperate sections in the drawer organizer. But what about other things in your home? Are your kids toys in a jumble or are your other kitchen utensils somewhere you know exactly where they are and you can reach them in one or two motions? Do you know where your bills are? Can you find what you need at your desk at work? Can find your keys every time you need to walk out the door? The list could go on and on.
Think about where the items in your home are located. Do they have a permanent "home"? Think about finding "a place for everything and everything in its place." Make a home for them and no matter how hard it is at first, put them back in the right place everytime. TEACH your family how to do the same and you will be amazed at how much easier you life will be. How easy is that?
Wednesday, January 27, 2010
Slow Cooker Liners

Dear Inventor,
I can't tell you how much I LOVE your invention: Slow Cooker Liners. I love crock pot cooking, in fact, I have 4 crock pots! Your product helps make cooking in the crock pot so easy...and easy to clean up! I love to use the liners when I cook a whole ham, or a whole rotisserie style chicken. Thank you for being so smart!
Sincerely,
A grateful woman who loves convenient cooking
For a whole rotisserie style chicken: place liner in your crock pot. Put chicken in pot, breasts up. If you don't want the neck and giblets, discard them prior to placing chicken in the crockpot...it will cook a bit faster. Sprinkle with a little seasoning if desired (I use season salt), no need to add water! Cook on High for 4 hours or low for 6-8 hours. If your chicken is frozen, add 2 extra hours of cooking time on High, or 4 extra hours on low.
You can eat the chicken, and it is super moist and tender. You can also shred the chicken and use it for a whole variety of things: salads, pastas, enchiladas, burritos, tacos...my recipe list goes on!
If you want to cook a ham in your crock pot, but are concerned because "the lid won't fit on"...never fear! Thank you Aluminum Foil! Place your ham in the crock-pot...however it fits best, and then cover the top opening with aluminum foil (like a lid covers the opening, you want the foil to insulate...it is ok if the foil touches the ham!). Then cook! A general rule of thumb is that most meats will reach their appropriate internal temperature after 4 hours.
In numbers: Low crock pot temperature is generally about 170 degrees F, and High temperature is around 200 degrees F. The best way to know that your meat is done, is to use a meat thermometer to check the internal temperature. Generally beef should be 170 degrees, and poultry should be 190 degrees. Instructions on your ham will usually tell you what the internal temperature should be.
Also, if you cook on low, you can assume to add 4 hours more than high. For example if you cook 3 hours on high, you would cook 7 hours on low, or 4 hours on high would cook 8 hours on low.
Using the slow cooker liner makes clean-up so easy. You can just pull the actual meat out of the crockpot, leaving all the juices and bones in the bag. Simply remove bag from the crockpot, tie it off, and toss it in the trash! All you have to do is a simple rinse of your crock-pot, and you're all done! How easy is that?
Organization
ORGANIZING--You either love it or hate. I love it!! It is kind of a hobby and I find it very therapeutic. I would like to share some of the easy ideas I have learned over the years. The first idea I would like to share is the idea of ONE MOTION STORAGE. This is a concept I learned years ago and has stuck with me.
What is ONE MOTION STORAGE? Can you retrieve an item from a closet or a drawer in one motion? Can you put the same item back in the closet or drawer in one motion? Let me give you an example. If you need a pair of scissors from the drawer, can you open the drawer and automatically find the scissors and pull them out without moving anything else in the drawer? If you can, this is ONE MOTION STORAGE. If you can't, let see if we can help you achieve it. If we can find something and pull it out or put it back in one motion, you are much more likely to put it back where it goes. If you have to dig in a drawer or worry that something will fall on your head when you get something out of the closet, you might have some work to do. Using scissors as our example, put scissors in all the places you use them maybe not just in one spot. I have several places I have scissors because I use them in the kitchen, at the desk, in the craft room, with the gift wrapping supplies. If you have multiples you can find a place in the drawer or in the area where you use them and put them where you can reach in and grab them in one motion and you can put them back in one motion.
Think about this. If you can even retieve things in two motions you are more likely to keep the area in order. Practice one motion storage maybe using your scissors as a practice tool. Then try it with other things in your home that seem to never get back where they should go.
How easy is that?
Tuesday, January 26, 2010
Crockpot Cooking
I love the crockpot. I own 5 or 6 because I use them for everything. I needed to take dinner to a friend last night so I decided to make one of my husband's favorite recipe. I made Apricot Chicken. All you need is 4-6 chicken breasts, 1 bottle of Russian Salad Dressing (16 oz.), 1 bottle of Apricot Jam (18 oz.) and 1 package of Lipton Onion Soup Mix. Spray the crockpot with cooking spray before you use it and it will clean up much easier. Mix the dressing, jam and soup mix in the bottom of your medium sized crockpot. Add the chicken pieces and cook 4-5 hours on high or 6-7 hour on low. Serve over rice. It is fast and yummy. How easy is that?
Monday, January 25, 2010
Convenience or Cost?
Sometimes when faced with a situation, you have to decide which is more important to you. Convenience or Cost? Here is the example I ran into this week.
I LOVE Clorox or Lysol wipes. They make cleaning SO Much easier, and I am more likely to keep my house clean if I use them. Being in med school makes money tight...always. As I was running low on my supply of wipes, I had a decision to make.
1. I can buy more cleaning wipes
2. I can buy cleaners, and clean the old-fashioned way
3. I can make cleaners (Thanks to the Book "Clean your house and everything in it", which deserves its own special post), or use cheap cleaners (Thank-you Bleach)
4. I can skip the cleaning all together (trust me, this was NOT actually an option!)
For me, with two kids, school, and being on the go, I had to decide if the convenience of wipes was more important, or if the buying/making more cost-effective products was better. I am all about saving money, but sometimes in order for things to get done, it is worth it to spend a little extra money and save your sanity!
In this particular case, both convenience and cost won!I chose to buy more cleaning wipes to have on hand for things like the counters and sinks (when I'm in a hurry). But I opted to make my own glass cleaner:
1 tsp. rubbing alcohol and 1 pint of water, mixed into a spray bottle.
How easy is that?
Another tip for cleaning glass: Use coffee filters, rather than paper towels, to clean windows and mirrors...they leave a streak-free, lint-free shine! :) Can't complain!
How easy is that?
Date Night Swap
With my husband being in medical school, me finishing up my bachelor's degree in nursing (all online), raising two kids, and doing all of those other things life requires...I definitely do NOT get enough time alone with my husband. As each year of medical school passes, and a new class of families move in, I have been asked the question on multiple occassions "How do you do it?"
Medical school is no "walk in the park"...for the student, or for his/her family. There are a few things that have helped me survive through these few years of medical school, but one of them tops them all. DATE NIGHT.
Sure, we all make excuses: I'm too busy, my spouse is too busy, we don't have time to find a babysitter, we don't have money to pay a babysitter (trust me, this one is HUGE in med school!), We don't have anything to do on a date, our kids need us....and the list goes on.
The first few months of medical school, I didn't dare ask my husband for a date, because I knew he needed to study. But, after months of not spending any alone time with him, I NEEDED to get out of the house, and go on a date. A few other girls in our townhome complex (also student wives) were feeling the same thing. So, we decided to do a date night swap.
There are 4 couples, each with kids. We each take one Saturday a month (you could do whatever weekend night that works for you), and for 2 hours (we do 6:30-8:30), we watch all of the kids. So, we always take the third Saturday of each month. This is great because it allows us 3 free weekend nights to spend time together. Often times we hit Redbox, go grocery shopping, eat dinner at home, eat at the food court at the Mall, stay home and do homework, or occassionally go out to dinner...but the bottom line is that we are together, without kids. Date night has become so important. It is something we look forward to...and when you KNOW that it is coming, you plan the rest of your week accordingly. For example, both my husband and I make sure that all of our studying/homework is caught up prior to date night, or else we know that we will spend our date night studying. We try to use one of our free weekends to go to dinner, play Wii, or do something other than homework, but I can't tell you how much this has brought us closer together. If you can't find 4 couples, use two, and swap every other week. If you want to have a little longer of a date night...like for dinner AND a movie...just make sure to make arrangements with those who are watching kids, and offer to watch their kids longer the next time!
Find other couples, plan to have a date night EVERY week, be a little flexible, and enjoy your time together with your spouse. How easy is that?!
Can I do without?
I love the saying "Eat it up, wear it out, make it do or do without." I have several examples of people in my life that know how to live this principle. I do have to say that it has taken me awhile to learn how to implement it into my own life and I'm not sure I can still do it very well, but when I do use this principle, it is amazing how many money saving benefits I receive. I have learned that if I can do without something, I feel like I have accomplished something great. It is kind of a fun challenge. I have adopted some personal questions I ask myself when I am thinking about buying something. The first one is " Do I really need it?" The second one is "Do I love it?" The third is "Where will I use it and where will I store it if I am not using it?" The fourth one is "Can I use something that I already have?" An example of using this last question for a real life situation is at Christmas time I was having a party at my home. I wanted to make things nice but didn't want to have to spend a lot of money. I was trying to think of something inexpensive to decorate with. I went over several options, all included going to the store. I didn't want to go to the store and spend more money. I racked by brain and remembered I had a bag of whole cranberries in the fridge I didn't completely use from Thanksgiving. I pulled them out and they were still good. I decided pull out some of my clear glass bowls and vases to use with the cranberries. I filled them with water, added the cranberries and added candles that I already had at home. It looked beautiful and was very easy and I had used what I had. I felt very triumphant that I could pull something together without having to go to the store and buy something.
These simple questions have saved me a lot of money over the years. Try them out or come up with some of your own personal questions that might help you make a better decision when thinking about buying something. How easy is that?
These simple questions have saved me a lot of money over the years. Try them out or come up with some of your own personal questions that might help you make a better decision when thinking about buying something. How easy is that?
Friday, January 22, 2010
Silpat

I have heard there are troubles of more than one kind.
Some come from ahead and some come from behind.
Some come from from cooking, and going Ker Splat!
Thank Heavens for something called a Silpat
Silpats are something you use when you cook,
For making and baking in your own little nook
It sits in your pan, and doesn't let anything stick,
Which means everything comes off, nothing short of slick!
Make pizza, pastries, cookies, or rolls,
Anything that smells good, and tickles your nose.
Can be used in the microwave, oven, or freezer,
As a gift it even makes a perfect people pleaser.
They come in a variety of shapes and sizes,
They might even help you win a handful of prizes
They are easy to use, and easy to clean
Easy enough to be used by your husband or teen.
Used by chefs and cooks around the world,
Martha Stewart has been known to give it a whirl!
There's nothing that can beat this AMAZING mat,
Give it a try, How easy is that?
Silpats are AMAZING! We use them for nearly everything! Their non-stick surface makes them useful for many situations. You can find them at many grocery stores, Bed Bath and Beyond, kitchen stores, and online. Visit their website for more information. (Picture courtesy of Silpat.com) How easy is that?
The ultimate stain fighter

I have raised 3 kids and am now enjoying 3 beautiful grandchildren. One of the things my next door neighbor recommended to me when I was first married was something called Felsnaptha. It comes in a bar like soap but is found in the laundry isle. I have used this over the years as has my daughter and daughter-in-law and it is a miracle worker on stains. I have yet to find one that it cannot get out. Just dampen your garment with a little water and work in some of the soap. Scrub it around a bit, making sure to not damage your laundry item, and either throw into the wash right away or let sit for a bit if the stain is more set in. I don't normally swear, but I swear by Felsnaptha soap. Check out Felsnapth.com How easy is that?
What I wish I would have known when I was younger
I wished I would have known that if I had bought all white towels, all I needed to do was to bleach them to keep them clean. How easy is that. If they get dirty, throw them in the wash with some bleach and they come clean. They may seem like they get dirtier faster but I think that is good way to remind you they need to be washed. This can cover every type of towel you own including kitchen towels and rags. A good type of dishtowels and dishcloths are Bar Mops. They are white and come in a package of two or three. They absorb easily and are a good size, not too big and not too small. Give it a try! How easy is that?
UNLIMITED EASY IDEAS
This is a blog for anyone and everyone. Have you ever wanted to find a place where you could find a quick and easy tip to implment into your life? We have!! We decided we would like to share some of the things we know, and even some things we don't but that someone else does. We hope we might be able to share some of our vast knowledge and wisdom (lol) of different things we have found to be helpful in life. We want to include easy ideas on cleaning, cooking, recipes, organization, family activities, crafts, gluten free living, time savers, budget savers, do it yourself projects.....obviously this list is unlimited, thus the name UNLIMITED EASY IDEAS. Life is short, don't waste it!! You can do easy things to simplify and enhance your life.
Subscribe to:
Posts (Atom)

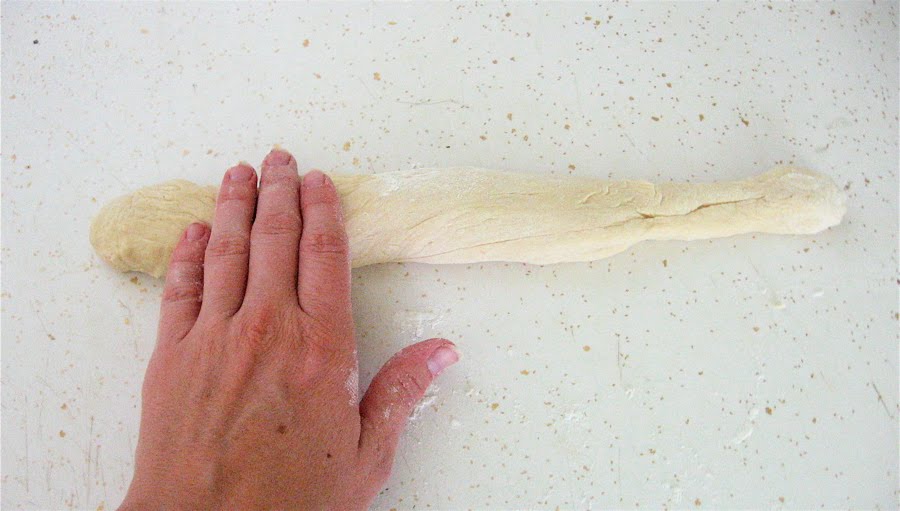